
OPNSENSE + NORDVPN + SHADOWSOCKS (ULTIMATE SECURITY)

Introduction
I’m citizen in Egypt, and our ISP doing DPI over network and blocking a lot of content such as (Medium, Proxy Sites, VPN Sites, Torrent, etc) and perform throttling over some services like (Streaming, Games, etc).
I needed a way so i can access the web materials freely and privately without the ISP controlling my digital life, so i bought from 1.5 years a NordVPN service.
NordVPN normal VPN servers are not working with me cause they use standard OpenVPN and ISP is blocking it, but they offer a obfuscated version on OpenVPN designed for them only and these servers accessible from the NordVPN client app only.
So i need to install the client on each device i use (Mobile, PC, Laptop) while i’m in home network, and they offer only 6 concurrent devices connected to the NordVPN Network with same account.
I worked with that for 1.5 years but i wanted to elevate the security in the home network. i wanted to VPN the entire home devices over VPN, and it was clear to me that i need to make the home router act as the VPN gateway but my ISP router doesn’t support OpenVPN so i decided to give pfSense router/firewall a try and it was big failure cause pfSense is buggy.
After some research, i found another router/firewall software called OPNSense and after trying it i was very satisfied and it was more stable and user friendly than pfSense.
I configured it with NordVPN and i started to connect to NordVPN from the firewall and it was a big failure cause the OpenVPN traffic was not obfuscated (NordVPN standard servers), so back to the same problem again.
I tried to contact NordVPN team but they couldn’t support me and i don’t blame them. they told me that the only recommended option is to use the NordVPN application on each device and use obfuscated servers.
But i’m a person who don’t quit easily, so after some research i found something called ShadowSocks or should i say “The Great Firewall of China pain in the ass software”, it’s opensource project to fight china firewall restrictions using SOCKS5 protocol as input and transmit encrypted data over TCP to another machine in the cloud and that makes the payload unknown to the local ISP cause the payload is encrypted and DPI can’t do anything about it.
There is another tools i discovered called Cloak on GitHub, it’s a promising tool also for fighting censorship but this tool utilize the HTTPS protocol standard and transmit data encrypted too like ShadowSocks. This tool is more powerful in nature cause blocking it mean that the ISP gonna block the HTTPS traffic and that could cause global internet failure for the ISP, but this tool not supported in OPNSense by default and it needed more technical part on the Firewall OS level. In this article i won’t discuss Cloak, only will discuss ShadowSocks.
I gave it a try without VPN and i was impressed, it bypassed the censorship without VPN, but ShadowSocks don’t give you privacy over internet, it’s only a way to bypass censorship.
So my idea was what if i merged ShadowSocks [Bypassing Capablities] with NordVPN [Security & Privacy] on OPNSense. Would it bypass ISP and connect to the normal standard OpenVPN servers provided by NordVPN.
I bought a cheap ShadowSocks server over cloud (Linode) and configured my firewall and VPN to connect to that server using ShadowSocks client on the firewall.
After giving it a try all the night, i found that it was successful try and i could connect to NordVPN standard server and i discovered that ShadowSocks is lightweight so it didn’t affect my bandwidth performance with NordVPN much. Only the cloud VPS bandwidth could affect the traffic cause you route your traffic though this server but Linode network is very good for me until now.
May be the ISP still can do throttling over the encrypted data or may be not, this need someone with high speed subscription to test but at least we are free and private from it.
After this long story i will explain In this article the technical steps to help anyone facing the same problem and for the good of humanity at the end we all concerned these day with our freedom and privacy over the Internet which called by physicists a (Type 1 Civilization Communication System).
Requirments
- Download OPNSense
- Buy NordVPN Subscription (3$/Month)
- Buy Linode ShadowSocks VPS (Marketplace) (5$/Month)
Technical Steps
- Download OPNSense (DVD, AMD64).
- Create a virtual machine or use physical machine and follow this user-manual for installation & configuration.
Note: OPNSense network configuration may differ between each and every network topology so understand the manual and configure the WAN & LAN as you prefer.
- Disable DHCP on your primary router and enable it on OPNSense using this manual.
- Now you are connected to the internet throw the OPNSense firwall directly. Next step is to install ShadowSocks.
- Goto System => Firmware => Plugins => Install “os-shadowsocks” from (+) icon in the right panel [Check this GIF for details].

- After installing ShadowSocks client plugin, you need to buy a VPS machine with ShadowSocks server on the cloud, for that you can use Linode cloud, after registration you will start creating Linux machine with ShadowSocks server on it from the Markerplace templates they have and it’s an easy process really.
- Enter the Linode template configurations like “ShadowSocks password”, “Linux machine root password”, “Datacenter location”, etc and press Create. [check the next GIF for demonstration]
Note: Linode cloud offer multiple plans (affect CPU,RAM,Traffic Quota, Inbound/Outbound Traffic Bandwidth) so choose what you need. the lowest price shared plan (5$) is very good plan and can meet a personal/home traffic needs.
- Now you have operational ShadowSocks server and you can get the IP of the machine from here.

- Before continue in the configuration, try first to ping that IP and make sure that connection is stable from your side [Use PingPlotter for best anaylsis].
- Now lets configure the OPNSense server ShadowSocks client to use that server.
- Goto Services => ShadowSocks => Local to configure the ShadowSocks client. (Like in down GIF)
- Enable ShadowSocks Local : Checked
- Server Address: Linode server IP
- Server Port: 8000
- Password: Linode ShadowSocks server password
- Local Address: 127.0.0.1
- Port: 1080
- Cipher: aes-256-cfb
- Now you have an online ShadowSocks connection but still not used in the firewall yet, but you can use it as a SOCK5 proxy server from your machines in the network.
- Let’s start configure NordVPN on the firewall to use that proxy and tunnel throw it.
- First you have to buy NordVPN subscription after that you can use this standard manual from NordVPN to configure your firewall with them.
Important Note: use the OpenVPN TCP4 configuration from NordVPN manual not UDP4 cause ShadowSocks don’t work with UDP.
- The standard manual don’t have a configuration about connecting to proxy server so i will add another step related to this screenshot from the standard manual.
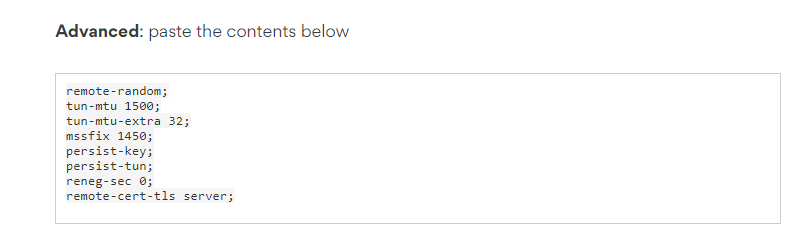
- Add in the end of this part in the advanced box this line
socks-proxy 127.0.0.1 1080;- This line will tell the VPN client to connect throw the ShadowSocks client you have on the firewall.
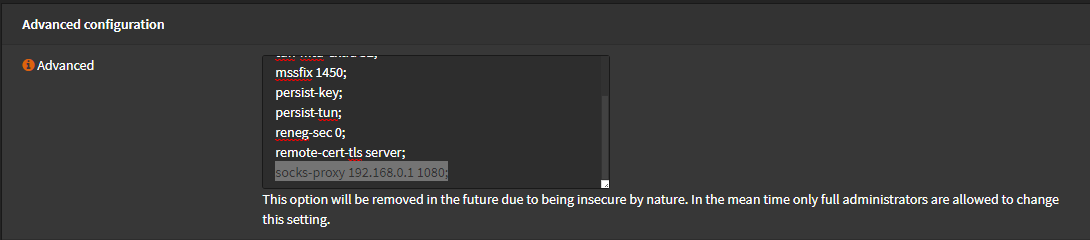
Important Note: make sure that in the VPN gateway to configure [Disable Gateway Monitoring = Checked] cause this is a virtual network gateway for the VPN (You gonna understand this line after doing the configuration from NordVPN standard manual) [Check below image].

- Last step, goto Interfaces => WAN and uncheck “Block private networks” cause this feature will make the VPN connection unstable because these firewall rules block the VPN traffic every period of time and makes the VPN client restart again.

- After that restart the firewall from Power=>Reboot in the WebUI.
- Now you can check that your are VPN protected from these sites
- Try this sites from your PC, Mobile to make sure all the devices is tunneled throw the firewall.
Note: you can choose the best NordVPN server near to you from this tool and if you faced any problem with this VPN server you can choose another one, until you find the best for you.
Feel free to contact me to exchange knowledge about another ideas in this area so i could enhance this post or release upcoming posts related to this subject.
Enjoy the ultimate security on the Internet. (RoofMan)


thanks
LikeLike
You are welcome
LikeLike
Hi
Your Article Is Really Great
I Have Another tweak For You
Instead of Nordvpn
Buy surfsharkvpn! They hve shadowsocks server ready! So you Dont Need To Buy A Shadowsocks server!
Just user shadow-socks server from surfshark and tunnel trough to openvpn surfshark!
LikeLike
I use standalone shadowsocks server cause i use suricata on the proxy server for security thats all, and your tweak is correct too.
LikeLike
Question: As soon as I put in the socks proxy in the vpn options I cant connect to that vpn anymore. What am I doing wrong?
LikeLike
Did you started ShadowSocks client with the server ?
LikeLike
Thanks for getting back to me. Yeah, I did. I followed your tutorial step by step and as soon as I add the “socks-proxy 127.0.0.1 1080” to the vpn config at the end that vpn connectoin to nord vpn is gone. Any ideas?
LikeLike
Try to configure the shadowsocks client bind ip to 192.168.x.1 not 127.0.0.1
and then bind the vpn to 192.168.x.1
and don’t forget the semi-colon (;)
LikeLike
Good idea, but it still didnt work. I have tried 192.168.1.1, I have tried a different local port on the client, I have tried it even from a fresh installation of opnsense. I dont know what to do anymore.
In my “Connection Status” tab it says that its status is “connecting” and here’s the last log entry, the one where it is all stuck on:
2021-04-29T20:20:33 openvpn[60160] Attempting to establish TCP connection with [AF_INET]192.168.1.1:1080 [nonblock]
I really hope that helps
Does it maybe need a specific fireall rule i’m not aware of?
LikeLike
did you configure your shadowsocks client with shadowsocks server on the internet ????
If so, try to connect to shadowsocks client from your pc using proxifier and validate it’s working first.
and make sure that your add firewall rule on lan
Source Port Destination Port
LAN net * LAN address *
LikeLike
So I guess its not on my end. Proxifier tells me this:
[05:01] Testing Started.
Proxy Server
Address: xxx.xxx.xxx.xxx:8000
Protocol: SOCKS 5
Authentication: NO
[05:01] Starting: Test 1: Connection to the Proxy Server
[05:01] IP Address: xxx.xxx.xxx.xxx
[05:01] Connection established
[05:01] Test passed.
[05:01] Starting: Test 2: Connection through the Proxy Server
[06:46] Error : connection to the proxy server was closed unexpectedly.
[06:46] Test failed.
[06:46] Testing Finished.
Is there anything in the linode config I did wrong?
LikeLike
you are connecting directly to shadowsocks from proxifier.
that’s wrong, you should connect to your socks5 client on your network which will connect to the shadowsocks server on port 8000
LikeLike
This is the connection toplogy
PC => 192.168.0.1:1080 (SOCKS5) => ShadowSocksIP:8000
LikeLike
Pingback: Cloak Your Internet Traffic | RoofMan Official Blog
hello when i add to the config this line socks-proxy 127.0.0.1 1080;
the vpn connection goes from up to connecting and it stays there…. … what can i do? my vpn connects but if i add socks-proxy 127.0.0.1 1080; it does not connects, tested shadowsocks on my cellphone and shadowsock is working, i do not know what to do
LikeLike
your shadowsocks ip should match socksproxy ip
Examples in order:
Shadowsocks = 127.0.0.1, 192.168.0.1
Proxy = 127.0.0.1, 192.168.0.1
LikeLike
Hello, your guide is amazing, however I seem to be having the same issue. I have followed you guide exactly, Shadow socks and openVPN both work independently. However when I attempt to combine the two using the line “socks-proxy 127.0.0.1 1080;” My OpenVPN connection suddenly gets stuck on “reconnecting” were you able to solve this issue?
Once again thank you for all your amazing work.
LikeLike
Thank you so much for your kind words and for reaching out with your issue. I’m glad to hear you found the guide useful.
To address the problem you’re encountering, it’s important to understand the design intent behind integrating Shadowsocks with OpenVPN. Essentially, the setup is meant to initiate a Shadowsocks tunnel that exposes localhost (127.0.0.1) on both the client and server. This means you need to ensure that Shadowsocks is configured to use 127.0.0.1 on the same machine where your OpenVPN client or server is running. If your Shadowsocks and VPN client are on different machines, you should instead use the 192.168.x.x IP address specific to your network.
I hope this clarification helps resolve the issue you’re facing. If you have any more questions or need further assistance, please don’t hesitate to ask. Your feedback and success are very important to me.
Thank you again for your support and for reaching out.
LikeLike
I ran into this and was curious why not use Nord VPN shadowsocks IP, or is there any kind of mismatch between locations of the VPN (wireguard/nordlynx) locations and socks 5 proxy they offer ?
LikeLike
I don’t have info about nordvpn shadowsocks servers.
Can you provide me with example ?
LikeLike
Hi Roofman, thanks a lot for this tutorial. It has helped me set up a basic configuration which works, kinda.
However, my connection is sooo unstable, it feels like I am getting throttled by ISP… There is some days (mainly saturday or sunday) where I get a reasonable connection (20-40mbps up & down). But most of the time I barely get 1mbps.. I was wondering if you have any experience with this kind of issue and can offer advice?
I have been scratching my head on this problem for months! Perhaps the shadowsocks connection protocol/security I have chosen is being throttled automatically. But connecting to the shadowsocks server directly, tested on multiple networks, doesn’t show this issue… Before I try any other tweaks I would like to hear your opinion and experience!
LikeLike
Please mention your country for knowledge share.
and check this article which address your issue and the solution.
LikeLike
Hi Roofman, currently residing in China. I read the article, seems like it could be a solution but I would really prefer keeping all routing/networking on my one opnsense box and not have to install anything on a secondary box..
LikeLike
Use VMware to virtualize everything on single hardware.
LikeLike